Maps and rooms / GUIDE 13
Kitchen and Dining Room Guide
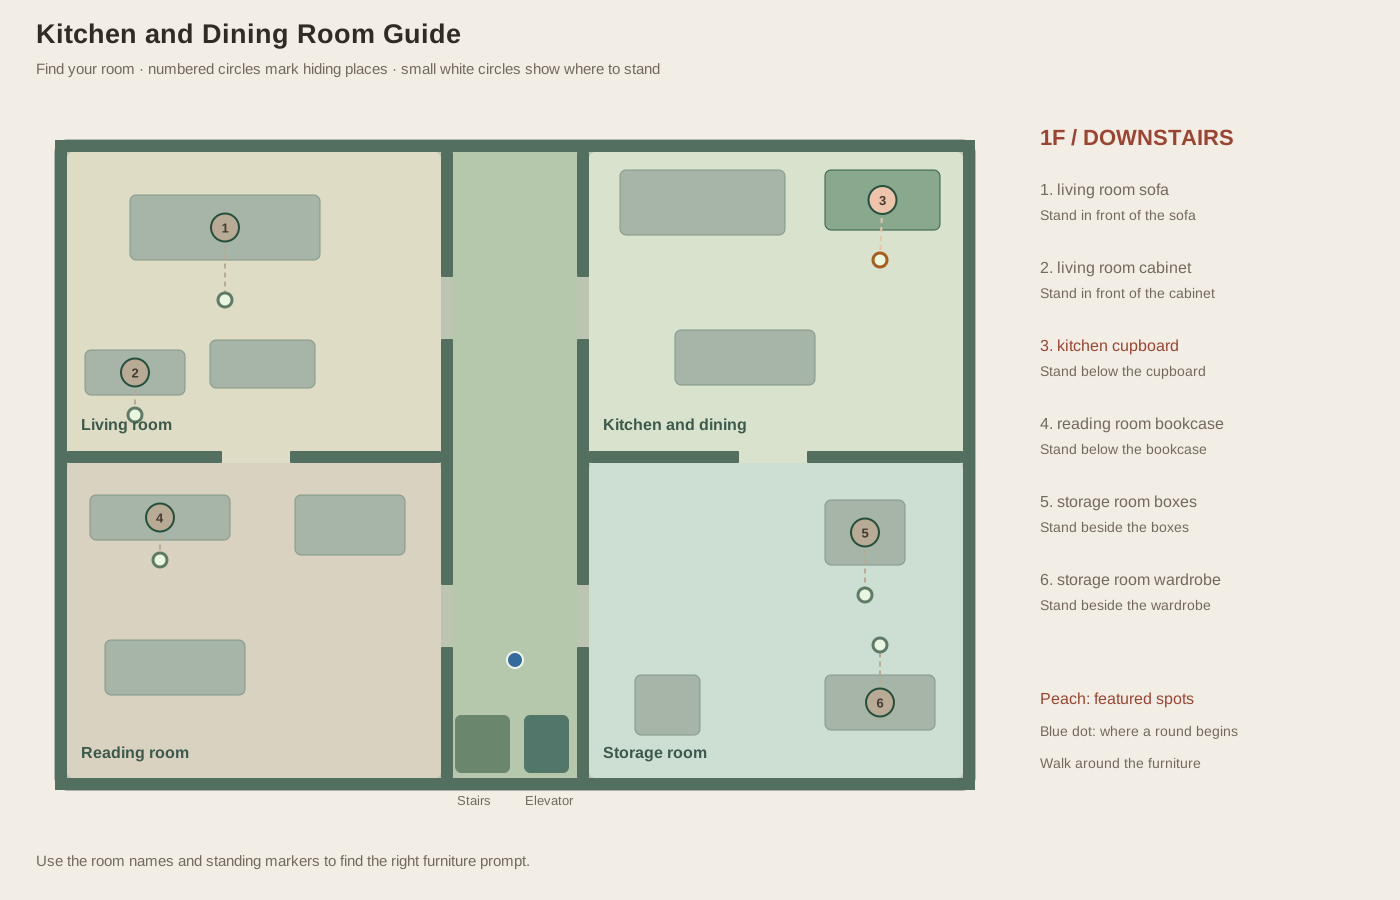
You enter the kitchen and see a counter, a dining table, and a cupboard. Which one should you check? For this room, the answer is simple: reach the cupboard near the upper-right corner and read its prompt. The kitchen and dining room is downstairs on the upper right, and that cupboard is its only hiding place. Knowing that lets you finish the room without spending the whole countdown trying every large object.
Enter through a real opening
The kitchen connects to the central corridor through the upper right-side opening. It also connects to the storage room below through a gap in the horizontal dividing wall. Use whichever entrance matches your search route. The upper counter and central dining table create obstacles inside the room, so choose a path through visible open floor instead of holding a direction straight into a solid piece of furniture.
The cupboard you want is near the upper-right corner, beyond the counter and dining area. Approach from the clear floor just below it and watch for its name. If you are still beside the table, move closer instead of repeating F from there. You can use the standing marker in the picture to recognize the right side. Once the prompt is correct, a single press is enough to check or enter the cupboard.
Clear the room in one confirmed check
In seeker mode, press F when the prompt names the kitchen cupboard. The search resolves immediately, with no player inspection countdown. An empty result marks that spot and rules out the kitchen for the rest of the round, because there are no other supported kitchen spots and AI hiders do not relocate. A successful discovery also clears its occupant and advances the found total.
You do not need to circle the dining table after that check unless your route requires it. The counter, sink decoration, and table do not conceal additional AI hiders under the current rules. Their appearance contributes to the room and affect where you can walk. The prompt, the spot atlas, and the single cupboard check are the useful references when deciding whether the room has been fully searched.
Hide with a realistic exit plan
In hider mode, approach the same cupboard and press F. The Hidden status confirms entry. Your faded character is placed at the cupboard's center, and movement keys stop moving you until you leave. If a seeker later inspects this exact spot, it can discover you. The upper-right location does not make the cupboard unreachable, immune to searching, or dependent on an elevator route.
Press F to leave, and you return to the open floor below the cupboard. From there, you need to navigate around furniture to reach the corridor or storage connection. Plan that first section before moving during an active search. Leaving a spot is not a dash, and your avatar choice does not improve your speed. A relocation can help if it avoids a specific inspection, but it can also leave you exposed near a seeker finishing a nearby check.
Practice efficient room decisions
A useful search drill is to enter from the corridor, reach the cupboard, complete one check, and leave toward storage. The next room has two usable spots, so this transition teaches you to change your expectations by room rather than applying the same search count everywhere. Try not to press F at the dining table during the exercise; that reinforces prompt-based interaction instead of visual guesswork.
A useful hiding drill is to enter the cupboard during preparation, leave once, and return before preparation ends. Observe the difference between the Hidden status and the out-in-the-open status. Use those words to tell whether you really entered the cupboard. Standing behind the table without entering a usable spot is still unhidden. Once you understand that distinction, the kitchen becomes a straightforward one-target room rather than a collection of ambiguous furniture shapes.