Maps and rooms / GUIDE 14
Reading Room Navigation and Bookcase Guide
You want a nearby place to learn the controls before crossing the whole house. The downstairs reading room is a good first stop: it is on the lower left, close to the starting corridor, and has one hiding place to remember. Reach the bookcase, confirm its prompt, and you have a complete room check as a seeker or a straightforward place to hide. The desk and sofa give you something to steer around along the way.
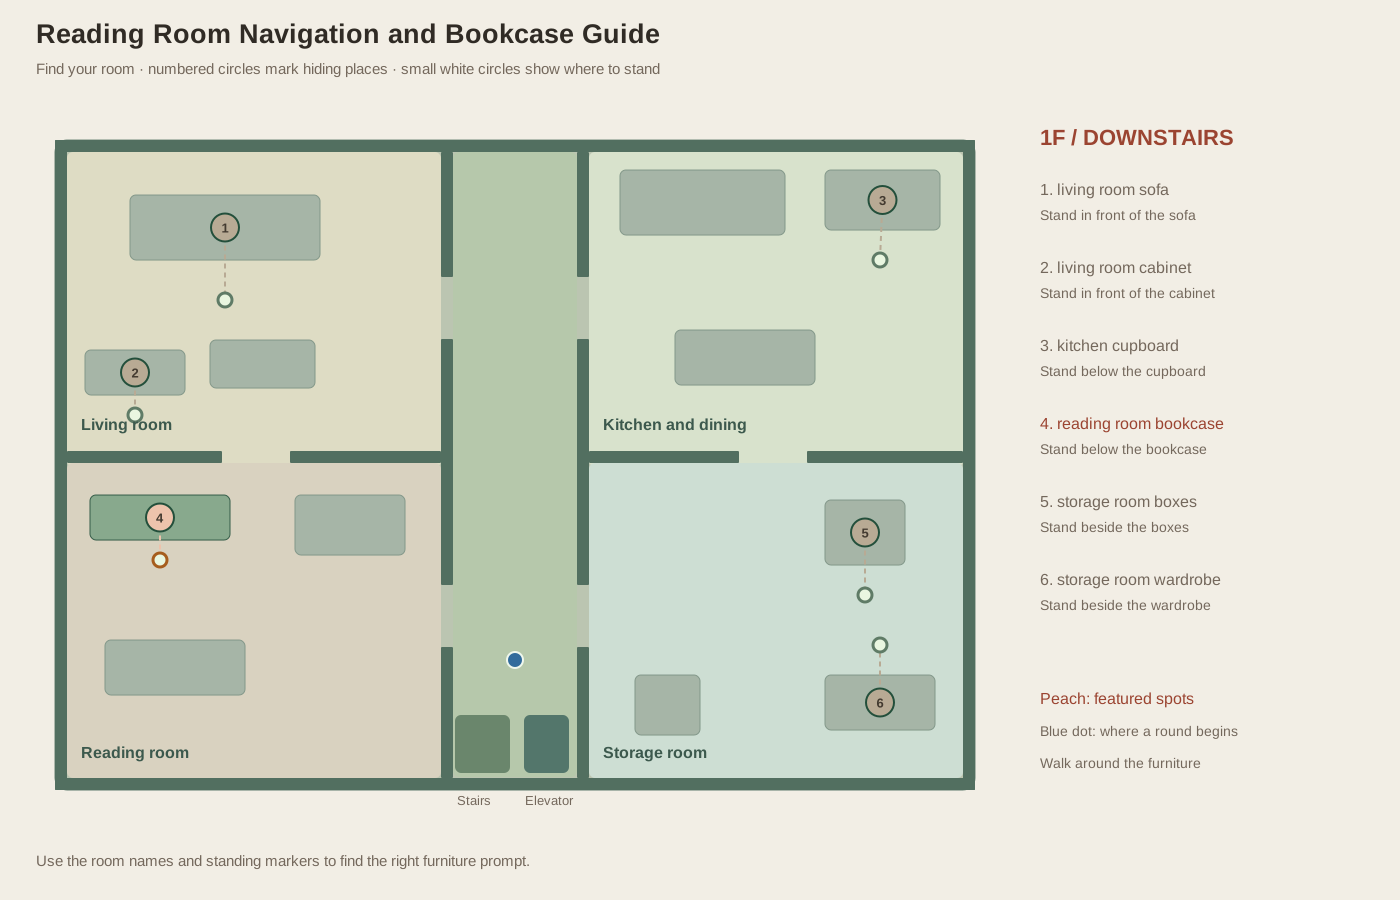
Navigate from the starting corridor
You begin in the lower part of the downstairs corridor. Enter the reading room through the lower opening in the corridor's left wall. Be aware of the desk toward the room's upper-right area. Walking west while slightly too far north can bring you into its solid furniture. If you stop moving, adjust into the open floor rather than pressing F to “open” a path through the furniture.
The reading room connects northward to the living room through an opening in the horizontal dividing wall. This lets you build a left-side search sequence without returning to the corridor between the two rooms. The lower sofa is not an interactive target. Its presence affects how you route around the room, but it does not add another place to inspect or hide.
Get close enough to use the bookcase
The bookcase you want is near the upper-left part of the reading room. Approach from the open floor below the shelf. If the prompt does not appear immediately, take a small step closer and look for the bookcase name. You do not need to press against the furniture or walk behind it. This clear standing area is also where you will step out again if you hide here and later leave.
In seeker mode, F checks the place immediately. A checkmark remains after a search, which helps you avoid returning unnecessarily. If the bookcase is empty, the reading room has been cleared for that round. AI hiders assigned elsewhere do not later walk into this shelf. If a hider is found here, it appears at its hiding location and contributes to the round's found count.
Understand the bookcase as a hiding spot
In a hiding round, press F when the bookcase name appears and look for Hidden. Your faded character now sits inside the furniture. That is the confirmation that the action succeeded. Standing nearby or trying to walk behind the shelf does not do the same thing. If you are preparing to move later, first notice where the clear floor and room exits are so that leaving does not begin with an uncertain turn.
Leaving with F returns you to the clear floor below the reading room bookcase. At that moment you are exposed again and can move toward the living room opening or the corridor entrance. The nearby sofa does not offer an emergency hiding interaction. If you intend to relocate, choose another actual spot before leaving. The living room cabinet is a named option on the next room's list, while the corridor leads to other rooms and transport.
Use a simple navigation exercise
Begin a one-hider seeker round and visit the reading room first. Reach the bookcase, check it, then walk through the northern opening into the living room. This exercise tests a real route segment that can become part of a complete downstairs sweep. Repeat it with short movement taps until you stop colliding with the desk or the dividing wall beside its opening.
For hiding practice, enter and leave the bookcase during preparation, then notice the exact return point before deciding where to go next. Do not label the room safe merely because it is close to spawn or far from the right-side rooms. AI seekers use randomized target orders and can cross floors. The reading room's practical advantage is familiarity: it offers one clear interaction and a useful connection to the living room. That makes it a reliable teaching location without making it a guaranteed winning hiding place.