Maps and rooms / GUIDE 12
Living Room Hiding and Searching Guide
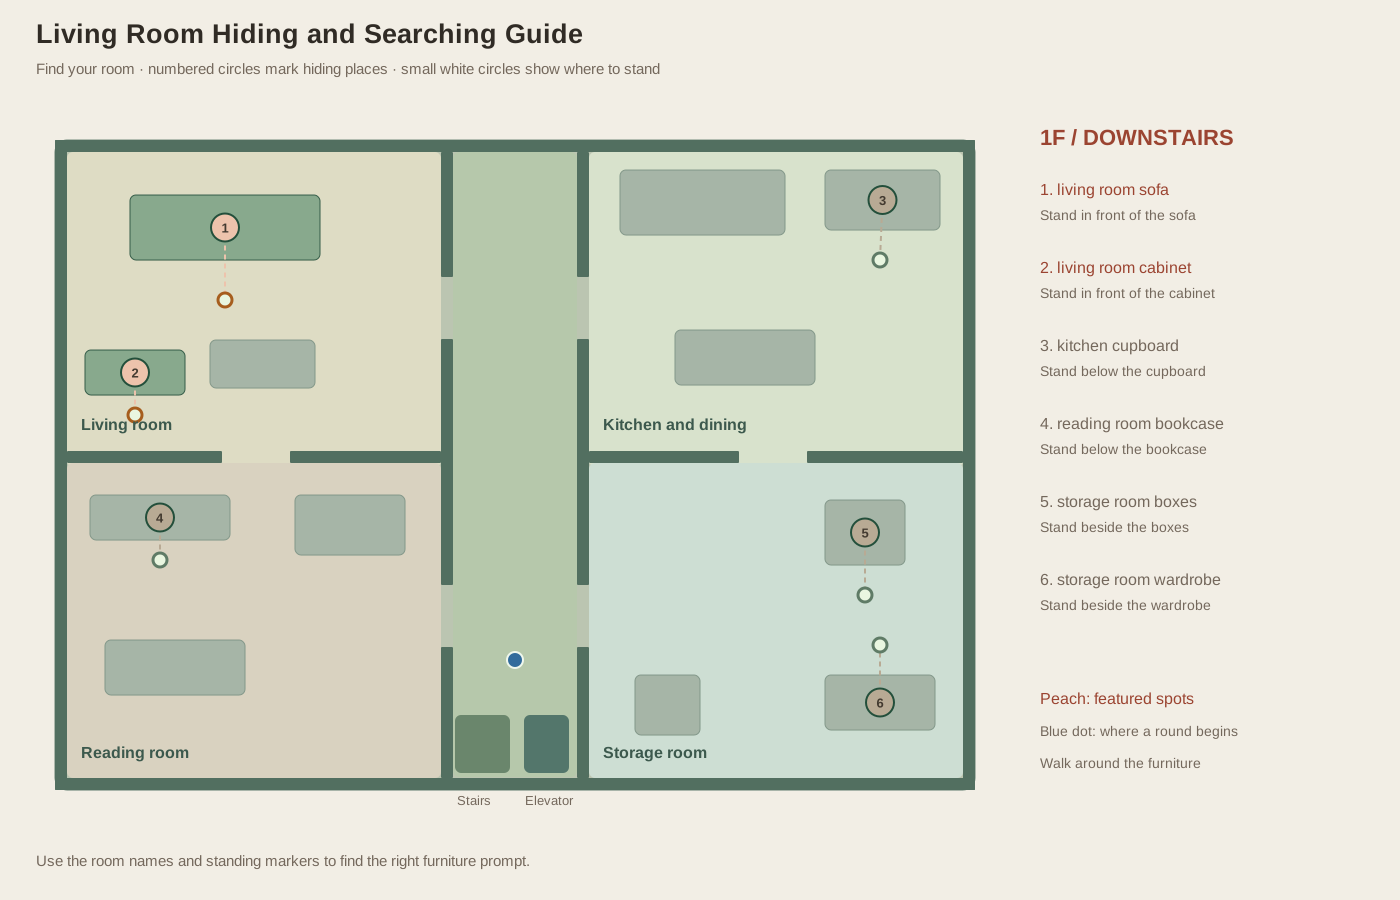
You have checked the living room sofa, found nobody, and are ready to leave. Before you go, remember the cabinet: this room has two hiding places, and either can hold the person you still need. The living room is downstairs at the upper left. Learning its sofa, cabinet, and two exits gives you a useful early stop when seeking and a familiar pair of choices when hiding.
Recognize the room and its entrances
From the downstairs central corridor, use the upper left-side opening to enter the living room. The room also connects to the reading room below through a gap in the horizontal dividing wall. The large sofa sits toward the upper-left area. A smaller cabinet is positioned along the left side farther south, and a table occupies some of the space between your travel lines.
The table is not a hiding spot. It still blocks movement, so a straight path between the two hiding places may need a small adjustment. If you arrive from the reading room, the cabinet is a natural first check. If you arrive from the upper corridor, either order can work. Choose based on your entry route and the prompt you can reach cleanly rather than an assumed clue about likely hider placement.
Approach the sofa correctly
If F does not respond beside the living room sofa, walk around to the clear floor in front of it. Being beside its back or far end can feel close without giving you the intended prompt. Take short steps until the wording names the sofa, then press once. This is a useful place to learn the habit of checking the name rather than pushing into furniture and hoping the action will happen.
In seeker mode, one F press checks the sofa immediately. If an AI hider is assigned there, it is found; otherwise the place receives an empty-search message and checkmark. In hider mode, F stores this exact sofa spot as your hidden location and places your faded avatar inside it. The sofa has no special resistance to AI inspection and no longer hiding duration than any other spot.
Treat the cabinet as a separate target
Find the open front of the cabinet near the lower part of the living room. Walk over from the sofa and confirm the cabinet name before checking. An empty sofa does not tell you whether the cabinet is empty too. A round with several hiders may occupy both places because different hiding places can both be occupied.
When hiding, leaving the cabinet with F returns you to the clear floor beside it. That return position is useful when planning your exit toward the reading room or corridor. It is also the point from which you need to walk around furniture and stay aware of nearby seekers again. A faded avatar does not drift along with WASD input, so you must leave deliberately before a relocation route can begin.
Use the room for a controlled exercise
For a seeker drill, enter from the reading room, check the cabinet, check the sofa, and exit into the corridor. Confirm that both places have been marked before leaving. Repeat the route in reverse in a later round. Because AI hiders are stationary during a seeker round, the exercise tests your coverage and movement rather than your ability to chase a target.
For a hiding drill, use preparation time to enter the sofa, leave it, and reach the cabinet before choosing your final position. This does not make the cabinet safe for the rest of the round; every AI seeker can eventually inspect either spot. It simply teaches reliable transitions between two known places. Once active searching begins, move only with a reason based on visible activity and the time left. The living room offers two usable positions and two exits, but it does not provide a guaranteed escape loop or a place the AI is forbidden to check.