Maps and rooms / GUIDE 18
Dressing Room Wardrobe and Chest Guide
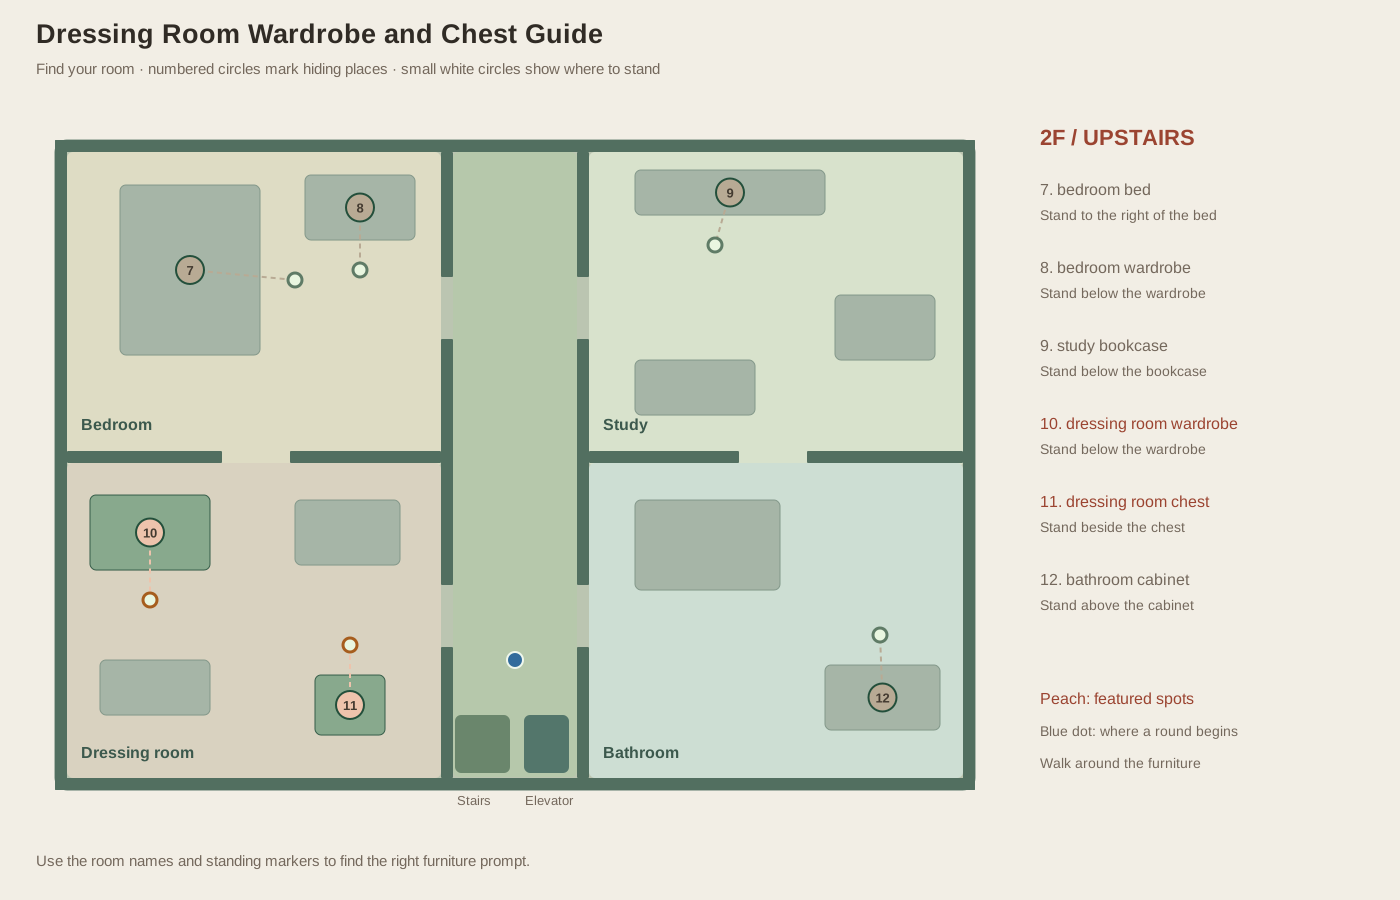
The dressing room contains more than one wardrobe, but only one of them offers a hiding action. If you are spending preparation time beside the wrong one, use the picture and the prompt to find the wardrobe toward the upper left. There is also a usable chest toward the lower right. This upstairs room has two places to remember, and learning both helps you avoid missing a hider or choosing a destination you cannot enter.
Reach the room from transport
After arriving upstairs near the bottom corridor, move north enough to line up with the lower left-side opening. Enter the dressing room through that gap. You can also reach it from the bedroom above through the opening in the dividing wall. Confirm 2F before following the furniture descriptions; downstairs, the corresponding lower-left room is the reading room with a different spot list.
The supported wardrobe lies toward the upper-left side of the dressing room. The supported chest is toward the lower-right area. Another wardrobe stands closer to the upper-right side, and a table occupies space near the lower-left corner. These additional objects can block a straight path even though they do not accept a hiding or search interaction. Walk around them using the open floor shown in the illustration.
Reach the wardrobe that responds
The wardrobe you can use is toward the upper-left part of the dressing room. Approach from the clear floor below it and wait for its name in the prompt. As a seeker, press F once and read the result. Whether you find somebody or mark an empty place, that is one completed check. You can then move across toward the chest without needing to open any extra menu or find a key.
If you walk to the other wardrobe and F does nothing, look at the prompt before assuming something is broken. Similar-looking furniture does not always offer the same action. Use the illustration to identify the wardrobe toward the upper left, then try from its open side. Learning which one responds saves time on later visits and avoids choosing a supposed emergency hiding place that you cannot actually enter.
Complete the chest check
Approach the chest from the open floor near the room’s right side. Route from the wardrobe through clear floor, then confirm that the prompt names the dressing room chest. This completes the room's second usable spot. With multiple AI hiders, wardrobe and chest can both be occupied, so a discovery at the first does not eliminate the need to inspect the second.
A useful seeker sequence is wardrobe, chest, then bedroom through the northern connection, or the reverse if your wider route calls for it. The exact sequence matters less than clearing both and avoiding unnecessary returns. The checkmarks persist for the current round, and stationary AI hiders cannot appear at a previously empty spot later. That makes a complete room sweep a reliable piece of progress.
Plan hiding around the real exits
As a hider, enter either named spot with F. Leaving puts you beside the furniture you chose, ready to move into the room’s clear floor. Those are substantially different starting positions for a relocation. The chest is closer to the corridor side, while the wardrobe places you farther left. This affects the path to your next destination, but neither place has a special safety rating or a different time taken to check the spot.
Practice both exits during preparation before using them under pressure. A hider cannot move while the Hidden status is showing, and one F press only leaves the current spot. Decide on a supported destination before exposing yourself. The bedroom provides two more spots through the north connection, while the corridor provides access to transport and the right-side rooms. None of those paths guarantees survival; they are navigational choices that become useful when you have a specific reason to avoid an observed inspection.