Maps and rooms / GUIDE 17
Study Bookcase and Room Navigation Guide
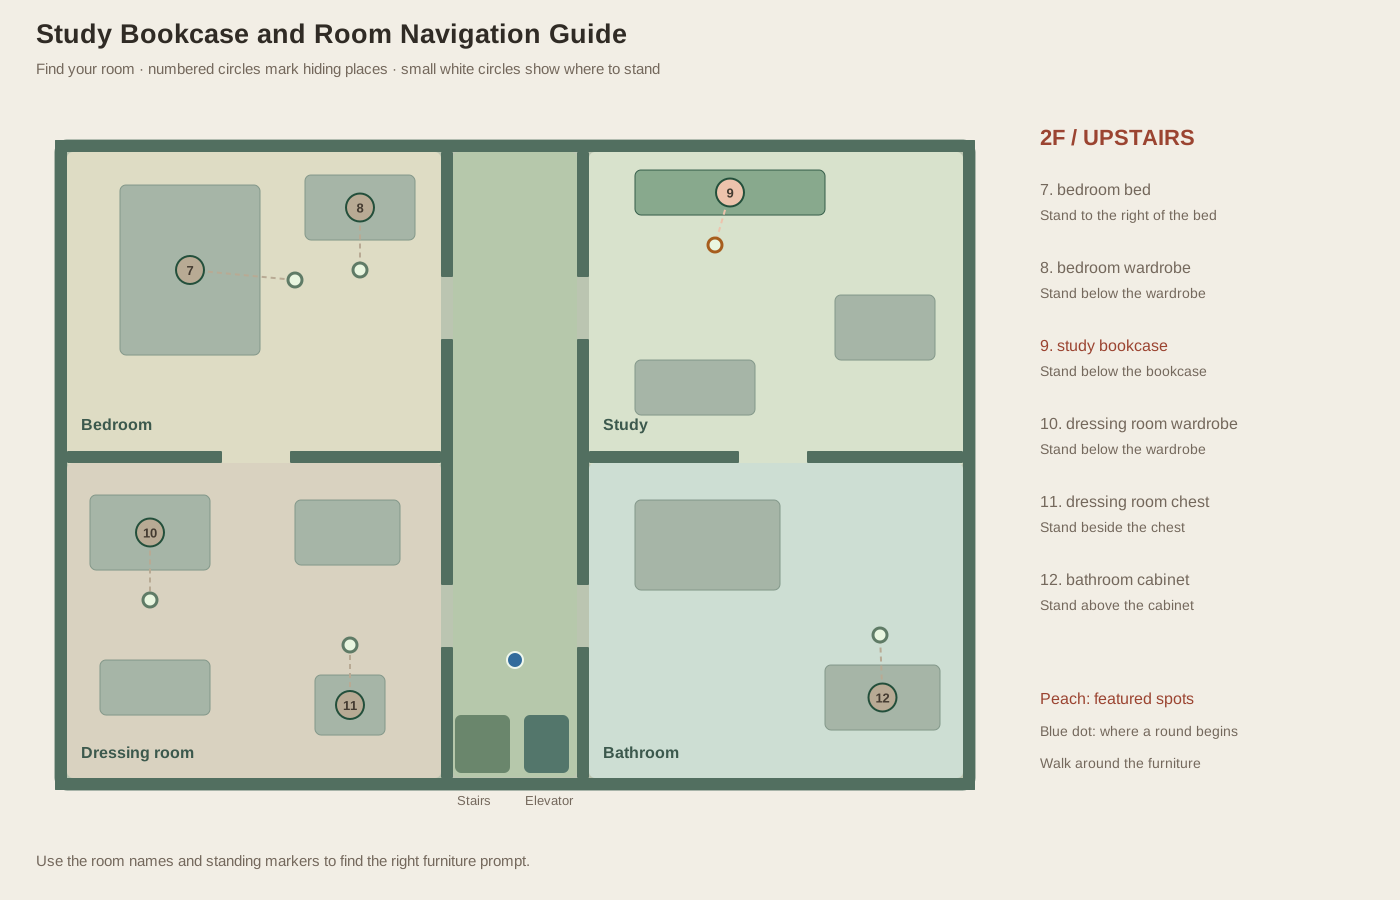
You arrive upstairs with little time left and want one room you can finish without a long checklist. The study, in the upper right, has just one hiding place: its bookcase. The desk and sofa may catch your eye, but you can walk around them and concentrate on the shelf. Learning this short visit makes it easier to connect the bedroom and bathroom during a larger search or choose a recognizable place to hide.
Enter the study without losing orientation
Reach 2F through either transport method and follow the central corridor north. Use the upper right-side opening to enter the study. If you arrive from the bathroom below, cross through the gap in the horizontal dividing wall instead. The wall layout resembles the downstairs kitchen, but the room's furniture and usable spot are different. Use the floor indicator and bookcase shape together to confirm where you are.
The desk sits near the right wall, while the sofa occupies part of the room's lower-left area. You must route around both. Neither furniture item responds as an additional spot when the prompt is absent. A large desk drawing is not an invitation to search underneath it in this version. Only the chosen bookcase belongs to the game's hiding pool for this room.
Find the clear side of the shelf
To reach the study bookcase, move toward the clear floor below the long shelf. Wait for the bookcase prompt before pressing F. If you are beside the desk on the far right, walk back toward the shelf rather than continuing to press from that corner. The standing marker in the illustration shows a comfortable place to aim. This gives the study one simple task: reach the shelf, confirm its name, and complete the check.
As a seeker, press F once to complete the check. The result is immediate, and the spot remains marked afterward. If it is empty, the study is fully cleared for that round. If it holds a hider, the found total increases. AI hiders stay in their initially assigned spots, so there is no reason to return later looking for a character that migrated from another room into the cleared bookcase.
Use the study as a hiding position
As a hider, the named F action enters the bookcase and the Hidden status confirms it. Your character looks faded and the camera may shift slightly as you settle into the furniture. You have not changed floors. If the view feels unfamiliar, check the floor label and the nearby desk before making a hurried move. A small change in the camera is a reason to reorient yourself, not a reason to abandon a hiding place immediately.
Leaving with F returns you to the clear floor below the study bookcase. From there, you can route toward the corridor opening or the bathroom connection, depending on your plan. The desk and sofa still constrain movement after exit. Do not leave while holding a direction into the bookcase and expect to pass through it. Establish a clear first movement into open floor before continuing toward an exit.
Fit the room into a larger plan
For a seeker route, the study fits naturally between the bedroom and bathroom in an upstairs circuit. Cross from the upper corridor opening, check the bookcase, then head south through the right-side room connection. This gives you one unambiguous completion condition before entering a bathroom with a much larger decorative bath. The visual contrast reinforces the habit of searching named spots instead of every piece of scenery.
For hider practice, use one AI seeker and enter the study bookcase before preparation ends. Observe whether and when the seeker comes upstairs without assuming its next target must be yours. Another round may bring the seeker to different rooms first, and every hiding place can be checked. The study is not protected by its distance from where the round begins downstairs. Its practical value is that its single hiding option is easy to recognize, which makes it useful for learning timing and observation without first mastering a complicated choice between nearby targets.