Maps and rooms / GUIDE 20
A Room by Room Checklist of Every Hiding Place
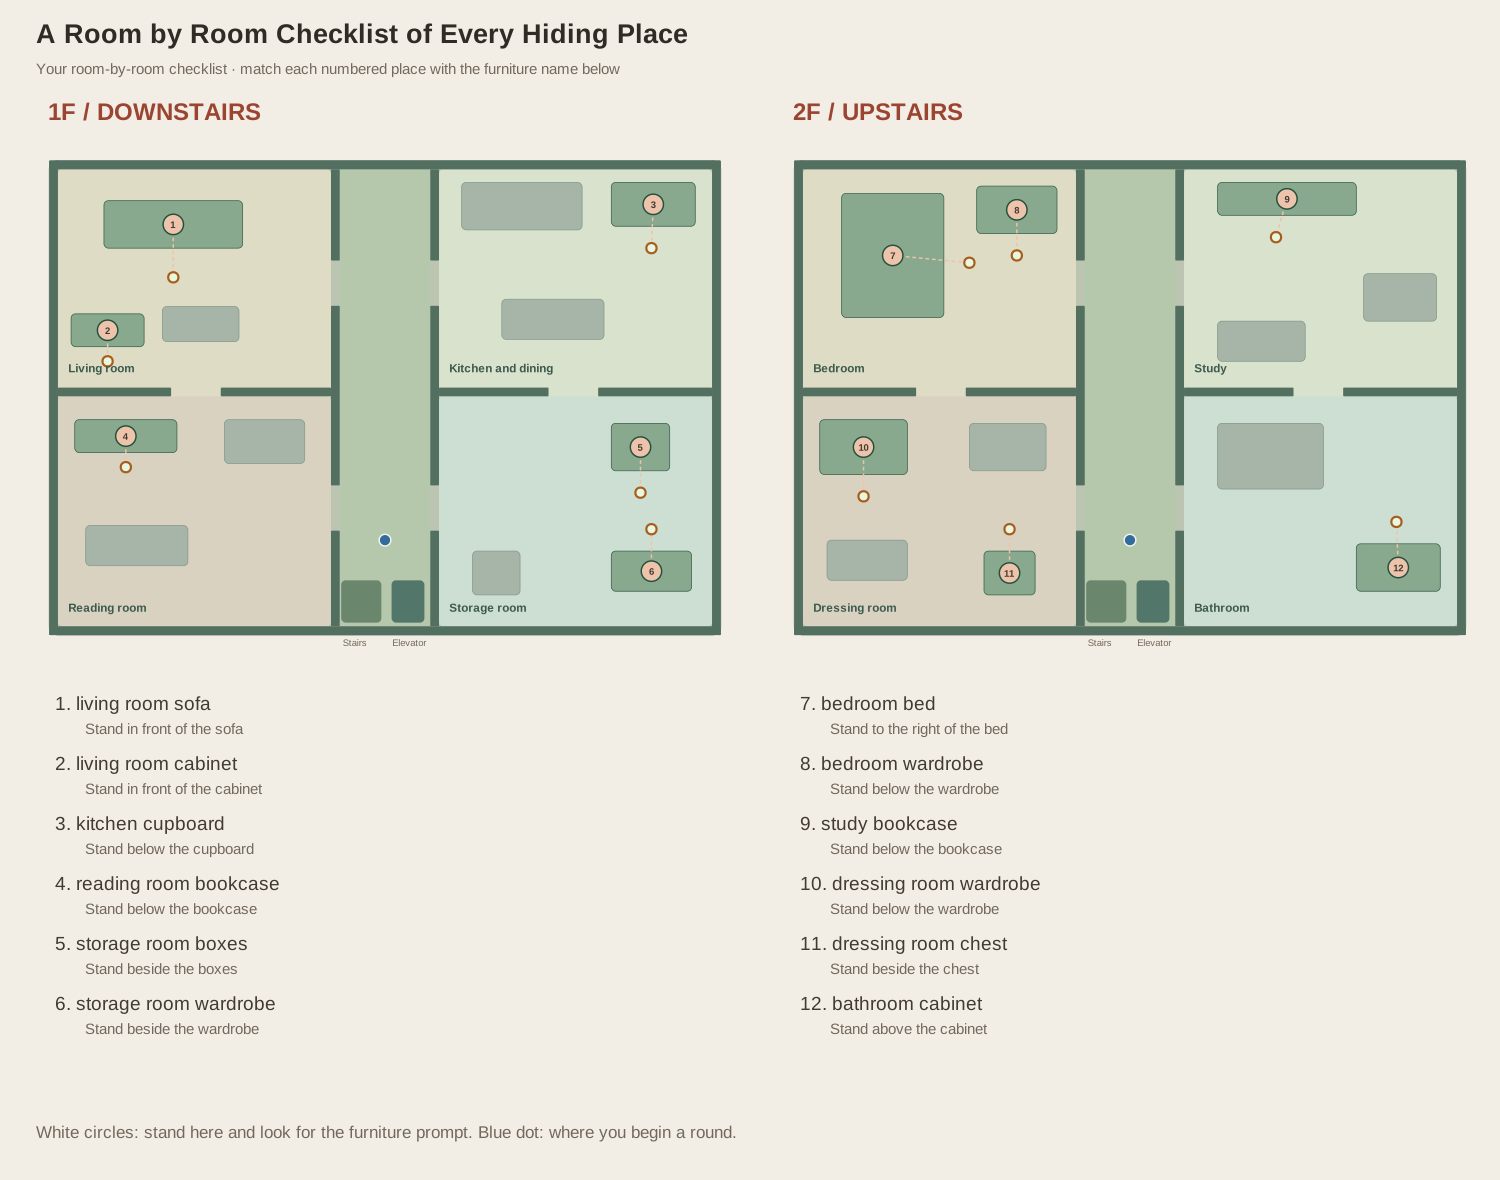
You have searched most of the house, but one hider is still missing. Before repeating random furniture checks, use this checklist to see which room may be incomplete. The villa has twelve hiding places, with six on each floor. Some rooms have two and others have only one. Learning the difference saves time and also helps you choose a real destination when you want to move during a hiding round.
Clear the northern rooms downstairs
In the downstairs living room, check the large sofa and the cabinet. They are separate places, so finding somebody in one does not clear the other. Approach the sofa from the open floor in front of it, and move toward the lower part of the room for the cabinet. Wait for the prompt to name each object before pressing F, especially when your attention is on the clock.
Across the corridor, the kitchen and dining room has one hiding place: the cupboard near the upper-right corner. Walk around the counter and table to reach it. The counter and dining table are not extra searches. Once you have checked the cupboard, the kitchen is complete for that round, and you can leave without circling every piece of furniture again.
Finish the southern rooms downstairs
The reading room has one hiding place, its bookcase near the upper-left part of the room. Approach from the clear floor below the shelf. The desk and extra sofa can block your path, but they do not add to the checklist. After checking the bookcase, you can continue north into the living room or return to the corridor, depending on your wider route.
Storage has two places: the boxes and the wardrobe on the right side. They are close together, so move toward the second one and check that the prompt changes before pressing F again. There is also another box nearer the corridor that is not a hiding place. When both named storage spots are checked, you have finished the downstairs set of six.
Work through the upstairs rooms
The bedroom has two hiding places, the bed and wardrobe. For the bed, approach from its right-hand side rather than pushing into its front. The wardrobe is nearby, so read the name carefully between checks. The study across the corridor has just one place, its bookcase. You do not need to search the study desk or sofa after clearing that shelf.
The dressing room has a wardrobe toward the upper left and a chest toward the lower right. Another wardrobe and a table are simply furniture to walk around. Finally, the bathroom has one hiding place, the cabinet near the lower-right corner. The large bath is a landmark and an obstacle, not another place to hide. Those rooms complete the six upstairs spots.
Use the checklist during a real round
As a seeker, mark rooms complete only after checking their full list. The AI hiders stay where they began, so an empty check remains useful information. If you have really cleared downstairs and somebody remains, head upstairs instead of revisiting the same cabinet. If you run out of time, compare the named remaining places with this checklist to identify the missed room or mistaken furniture choice.
As a hider, use the same list to choose somewhere you can actually enter. Standing behind a decorative object is different from pressing F and seeing Hidden. The small standing markers in the illustration show which side to approach; they are not secret hiding places of their own. You do not need to memorize every spot immediately. Start with two neighboring rooms, learn their prompts, and add the rest as the house becomes familiar. The checklist remains available whenever a nearly finished round leaves you wondering what you overlooked.